How to Add Booking Calendar to Weebly
Did you know that businesses that feature online booking calendars on their websites experience a 26% increase in customers?
In today’s rapidly moving digital world, customers simply expect convenience. The ability to book appointments and services online, 24/7, from any device, is no longer a luxury. Now, it’s simply a norm any modern service businesses should offer.
In short, if you are a service business that relies on customer appointments, adding a booking calendar and online booking functionality to your website is a great way to increase bookings and improve customer satisfaction.

Is your business currently using a Weebly website but don’t know how to add booking calendar and online scheduling functions? You’ve come to the right place.
In this article, we’ll cover how to add a booking calendar to your Weebly website from start to finish. We’ll provide you with step-by-step instructions, from choosing the right booking calendar solution to preparing your Weebly website to the actual integration process.
By the end of this article, you’ll have enough knowledge to set up the online booking functionality for your business website on your own.
Let us begin this guide right away.
Why Adding Booking Calendar to Your Website?
As briefly addressed above, today’s customers simply expect the ability to interact with businesses online.
Customers prefer online booking over the traditional methods over the phone or email due to a number of reasons:
- Convenience
Time is becoming more and more valuable for everyone. With online booking, customers can book their appointments whenever they have free time, and with just a few clicks.  Customers appreciate the convenience of avoiding the hassle of waiting half a day for an email reply or lengthy phone calls.
- 24/7 availability
Many customers now prefer booking their appointments outside business hours when they have free time after work. If your business only offers to take appointments by phone calls during work hours, they’ll move to your competitors.
With the online booking calendar function on your website, you can accept appointments 24/7 around the clock. Customers can book your services at their convenience, even if it’s 2 AM.
- Mobile accessibility
More and more people are now (exclusively) using mobile devices to browse the internet and interact with businesses online. Online booking allows customers to book services from anywhere and on any device. This benefit of mobile accessibility would align with the busy lifestyles of today’s consumers better.
- Reduced friction
Traditional booking methods (i.e., over the phone or via email) often involve lengthy back-and-forth communication. Not only is this time-consuming, but it can also lead to miscommunications, errors, and missed opportunities.

Online booking, on the other hand, streamlines the booking process with an intuitive, clickable calendar where customers can view availability and choose the desired services/time slots with ease. This will effectively reduce friction and ensure the clients get the time slots and services they need.
- More data and insights
Online booking solutions automatically collect valuable customer data. Businesses can leverage this data to improve their products/services, business operations, and marketing strategies.
To summarize, an online booking calendar is a win-win solution for both the service businesses and the clients: businesses can save their time and resources, prevent double bookings (and other errors), and reduce no-shows. Customers, on the other hand, can have more convenience in booking their appointments, enhancing customer satisfaction.
Simply put, online booking is a must-have for any service business that wants to stay competitive in this digital age.
Adding Booking Calendar to Your Weebly Website: Step-By-Step
Now that you’ve decided to add an online booking calendar to your Weebly website, in this section, we’ll discuss how to do so in a step-by-step guide.
Without further ado, let us begin with the first step right away:
Step 1: Choosing your booking calendar solution
In adding a booking calendar functionality to your website, you basically have two options: building the function from scratch (which is more difficult, time-consuming, and expensive) or simply integrating a ready-made booking calendar solution. In this guide, we’ll focus on the latter.
Thus, the first step you should do is to choose the right booking calendar solution for your business, and to do so, you’ll need to first assess your business’s specific booking needs.
Identify the following factors:
- Unique requirements
- Appointment types: What are the types of services or appointments your business offers? Will you only offer one-on-one sessions or other types of appointments (group classes, consultations, etc.)?
- Staff availability: How many staff members (or service providers you have), and what are their working hours? Businesses that have multiple service providers with widely varying schedules may need an online booking solution that can cater to this complexity.
- Resource management: Does your business involve booking specific equipment or resources? If yes, make sure the online booking solution can handle these complexities.
- Scalability requirements
- Growth potential: Will you be adding more locations, services, or staff/service providers in the near future? Choose an online booking calendar solution that can accommodate your scalability plans without causing major disruptions

- Seasonal variations: Does your business typically experience seasonal fluctuations? Your online booking solution should be able to handle spikes in demand without slowing down or crashing.
- Integration: Choose a booking calendar solution that offers integration with your existing software or tools (i.e., CRM, email marketing software, databases, etc.) Especially consider critical systems.
- User-friendliness
Evaluate how easy it is to use the online booking solution from both the perspectives of your staff/service providers and your clients. Even if the booking solution offers a robust set of features, it shouldn’t be too complicated to operate, or it will deter potential customers.
- Cost-effectiveness
Evaluate the pricing structure offered by the booking solution and whether it aligns with your budget. Also, assess whether there are any hidden costs.
- Security and data protection
Make sure the online booking solution complies with your area’s data protection laws and regulations and has implemented adequate security measures to protect your customer’s data privacy.
- Customization
You’d want an online booking solution that offers enough customizability to match your website’s branding and aesthetics needs.
- Support and training
Assess whether the manufacturer offers enough training resources and reliable customer support. No software is perfect, and you’d want help to be available and swift when needed.
By thoroughly assessing your business’s needs, you can specify which features and functionalities you’ll need from the booking calendar solution. List the must-have features and nice-to-have features, so you can make an informed decision to choose the best possible software according to your business’s objectives.
Based on the criteria above, we’d suggest Bookeo as an ideal solution for adding a booking calendar to your Weebly website.

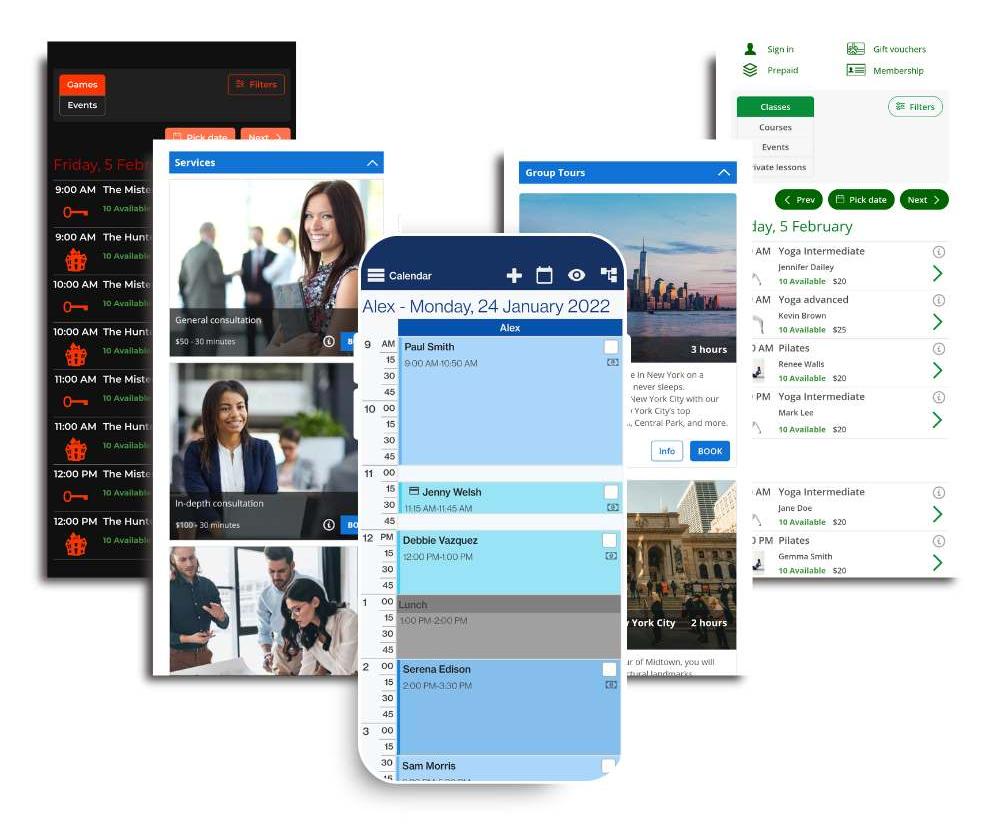
Bookeo is a versatile and robust online booking that can facilitate 24/7 online booking for businesses of all sizes and in any industry, offering the following features and benefits;
- Ease of use: Bookeo is intuitive and easy to use for your staff, service providers, and clients. Easily create and manage your booking calendar with ease, while customers can book your services with just a few clicks.
- Flexibility: Bookeo offers a variety of options to cater to the booking needs of different businesses. For example, Bookeo facilitates one-on-one appointments, recurring appointments, and group appointments.
- Scalability: Bookeo is a very scalable solution, ready to meet your needs as a growing business, and can grow with you. Easily add more staff members, service options, and locations as you expand your business.
- Cost-effectiveness: Bookeo offers a number of different pricing plans catering to the needs of different sizes of businesses to ensure cost-effectiveness.
- Reliable customer support: Bookeo offers reliable 24/7 technical support. Anytime you have any questions or inquiries about Bookeo, they will provide helpful answers in a timely manner.
Step 2: Preparing your Weebly Website
Once you’ve chosen your booking calendar solution (we’ll use Bookeo for the rest of this guide), the next thing you should do is prepare your Weebly website.
First, log in to your Weebly account. If you haven’t got a Weebly account yet, you can get one in a breeze:
- Visit the Weebly website (www.weebly.com) to start the account sign-up process. Click “Sign Up” in the top right corner.
- Weebly offers different plans you can choose from, including a free plan. Select the right plan according to your business’s needs and available budget.
- Create your account by following the on-screen instructions.
- Weebly offers a free subdomain, but you can also connect your own custom domain if you already have one.
Domain and hosting requirements
While Bookeo is compatible with all Weebly websites, it’s best to re-check the following domain and hosting requirements for seamless integration:
- Domain connection: if you have your own non-Weebly domain name (i.e., yourbusinessname.com), make sure it’s connected to your Weebly account. Connecting the domain name is typically very easy, involving adjusting your DNS. You can check out this guide by Weebly on how to connect your domain name.
- SSL certificate: It’s critical to make sure that your website has a working SSL certificate (HTTPS instead of HTTP), ensuring that any data exchanged between your website and your customers is end-to-end encrypted.
Step 3: Setting up Website Integration in Bookeo
The next step once you’ve prepared your Weebly website is to set up the integration on the booking solution’s side of the equation.
If you are using Bookeo, you can follow these simple steps:
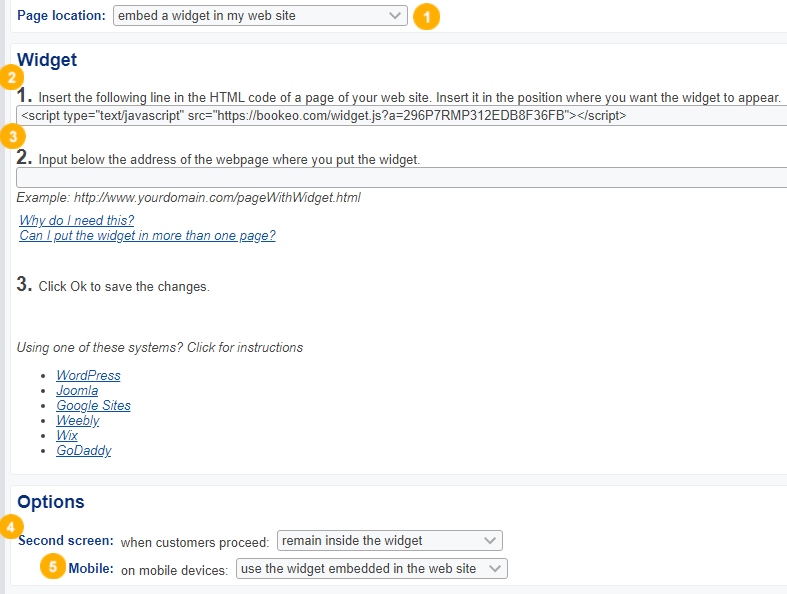
- Login to your Bookeo account then click on “Settings”->” Website integration”

- Choose the option “embed a widget in my website” on the “Page location” dropdown menu (number 1 on the image.)
- There will be a widget HTML code shown on the screen now, copy this code.
- In the “Options” section from the “Second screen” (number 4 on the image) dropdown menu, select:
- remain inside the widget, or
- open a separate full-screen page
- In the “Options” section from the “Mobile” (number 5 on the image) dropdown menu, select:
- use the widget embedded in the website
- enlarge the widget to full screen
That’s it, you’ve done the Bookeo’s side of the integration process. Now leave the Bookeo browser tab open, and open a new tab for the next step.
Step 4: Set up the integration in your Weebly website
- Log in to your Weebly account if you haven’t already, then create a new page. You can name this page anything (i.e., “Online Bookings,” and this page will be where your online booking calendar widget appears.
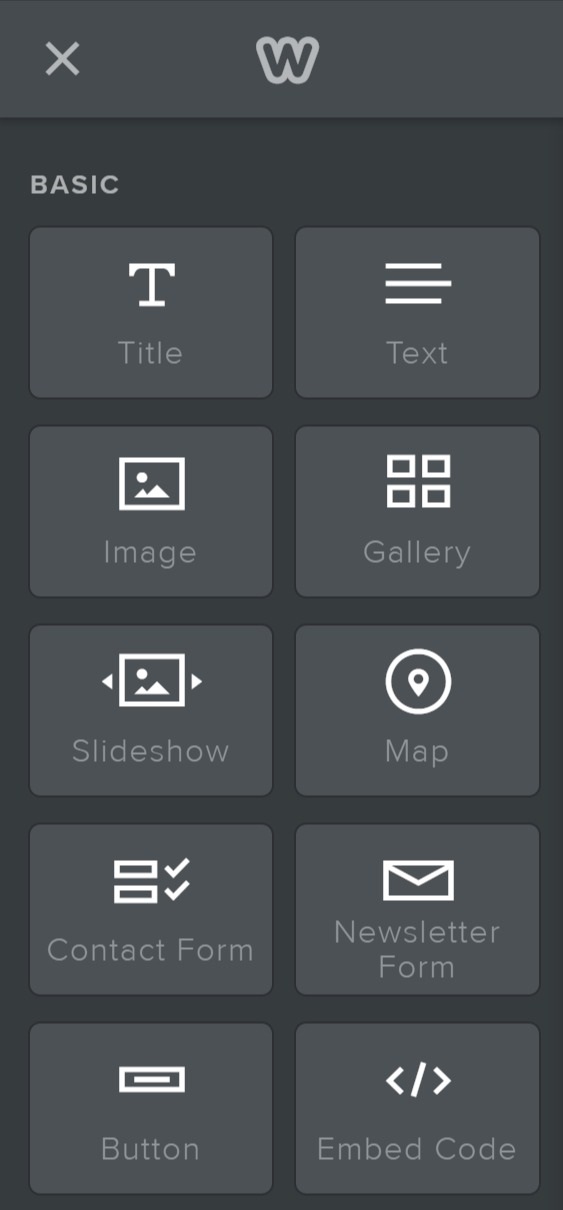
- Open this new page, and then drag and drop the “</> Embed Code” option from the Weebly toolbar (see image below)

- Click on the “Click to set custom HTLM” element (see image below), then on “Edit custom HTLM”. This is where you paste the widget HTML code copied in the previous step.

- Click on the “Publish” button at the top of the screen. It will open your created website on the browser.
- Go to the created “Online Booking” (or whatever the name of your created booking page), and copy the URL of this page for the sake of the next step.
Step 5: Finalize the Integration on Bookeo
This step should be relatively simple, and here’s what you should do:
- Go back to your still open Bookeo tab, then go back to “Settings”–>” Website integration.”
- Paste the booking page URL you’ve copied in the “Widget” section
- Click Save
Voilà! You’ve finished the integration process, and your Weebly booking page should be good to go. However, your job doesn’t end here, the next step you should do is to test your newly integrated booking system before publishing it to the world.
Step 6: Testing the Booking Calendar System
Conduct a trial run to test the booking system. The goal of this step is to identify any potential issues to make sure everything is working properly.

Put yourself in a potential client’s shoes, and do a step-by-step trial run as follows:
- Visit your website and navigate it just like a potential client would.
- Locate the booking page or widget on the website. How easy is it to find the widget? Is it prominently displayed? Do you think there are better locations to put the booking page or widget?
- Try booking an appointment:
- Choose a service or appointment type that you offer. If there are any advanced options (one-on-one vs. group appointments, etc.), try taking any of these options.
- Choose a service provider (optional) if your business has multiple service providers.
- Try choosing different dates and time slots to ensure the booking calendar is functioning properly, then pick a time slot.
- Fill in the necessary information (name, contact information, etc.) required for the appointment. Try to identify any errors or issues.
- Confirm the appointment booking. Check whether you receive a confirmation email.
Consider involving team members and service providers, as well as a select group of clients, during the test runs. They may be able to provide unique insights in their feedback and help you identify areas for improvement.
Step 7: Optimization
Here are a few tips to optimize the booking process:
- Optimize the booking process so it’s as streamlined as possible. Reduce the number of steps, and only capture the absolutely necessary information to reduce the number of data customers must input. This will also tackle data privacy concerns.
- Consider allowing customers to book multiple services with a single booking process. This can allow them to save time and streamline the overall booking process.
- Offer the ability for customers to pay for their appointments during the booking process. This can save your business time and hassle and can also help you with a better cash flow.
Step 8: Continuous Monitoring and Improvement
Now that you’ve properly integrated the booking calendar into your Weebly website, it’s important to continuously monitor its performance and measure the success of your implementation.

Doing so can help you identify what’s working and what could be improved further.
Some common metrics you can use to monitor the booking calendar’s performance include:
- Number of booking/booking volume: The total number of appointments booked through the online booking calendar.
- Booking conversion rate: The percentage of website visitors who successfully book their appointments.
- Revenue growth: The impact of your online booking system on the business’s bottom line.
- Average booking value: The average amount of money that customers spend when they book an appointment online.
Closing Thoughts
In conclusion, to add a booking calendar on your Weebly website, you can follow the following steps:
- Choose and sign up for an online scheduling service
- Connect the online scheduling service to your Weebly website, follow the solution’s instructions
- Create a booking page on Weebly
- Customize the booking page, add accurate information, optimize as you see fit
- Publish the scheduling widget/page
That’s it. By following these relatively simple steps, your customers are now able to book appointments with your business directly on your website on Weebly.
Enabling 24/7 online booking and appointment scheduling won’t only save your business’s time and resources, but will also improve customer satisfaction and loyalty. In today’s digital age, a streamlined booking process can literally make or break the success of a service business.
